Oxytocin Madonna Part 2: The Big Inkening

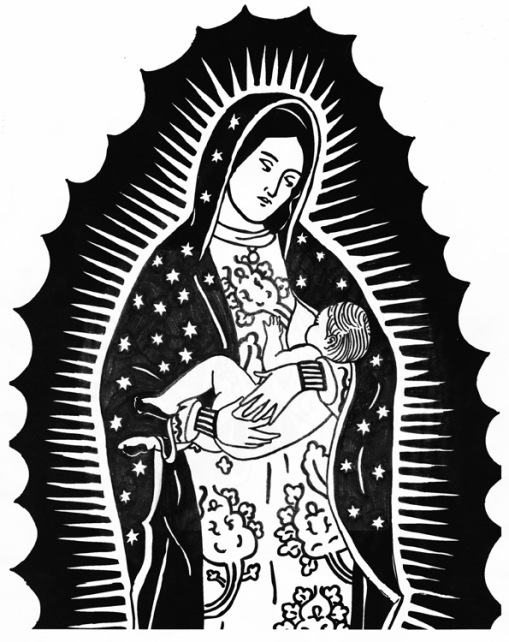
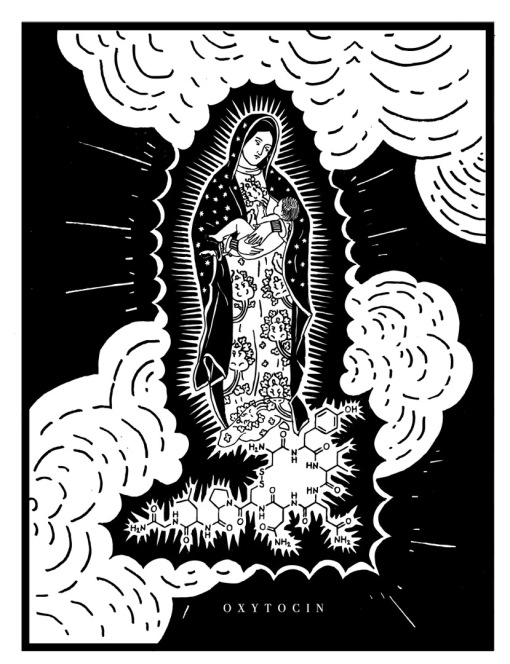
Hey everyboy!  A while back I shared an image I was developing for an oversized woodcut called “Oxytocin Madonna”.

bigink6

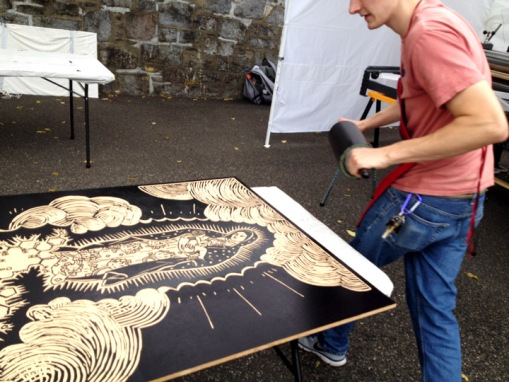
Tali Supervises the transfer and carving process.

What I didn’t mention at the time was that the image was for an application to participate in BIG INK at the Center for Contemporary Printmaking in Norwalk, Connecticut.  Shortly after submitting, I was accepted to participate, and last fall I and six other artists got to print our giant woodcuts on “The Big Tuna,” BIG INK’s oversized portable press.

bigink1

The aroma of fresh lavender and oil-based ink was mixing together beautifully outside the Helen Frankenthaler Printmaking Cottage at the Center for Contemporary Printmaking.

bigink3

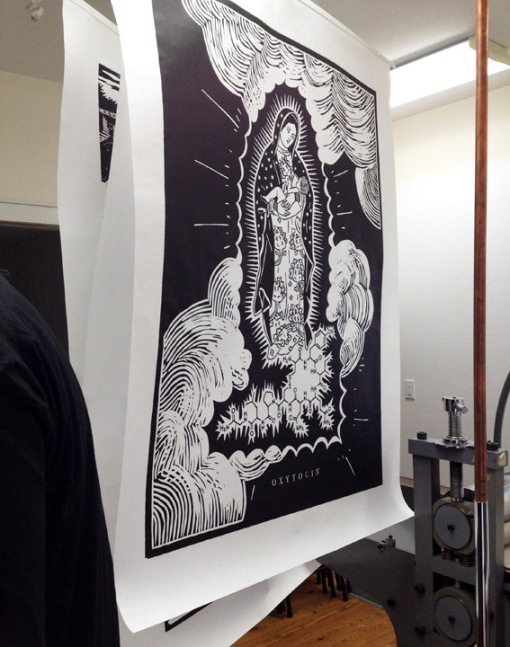
“Oxytocin Madonna” a.k.a. Big Lupe getting inked up.

bigink4

Paper getting lined up, and Lupe sliding into place on the press.

bigink5

Hot off the press!

bigink2

Chilling in the drying rack.

Participating in BIG INK was an incredibly fun and overwhelmingly positive experience.  If any of you reading this are interested in oversized woodcuts, I strongly recommend that you apply to a BIG INK event.  Or at least attend one and watch the oversized magic happen.

Oxytocin Madonna – Part 1

Howdy everybody!  I just finished up the design for a new woodcut.  This is going to be another oversized block and I’m super excited about it.  There’s a lot left to do; I still have to blow the image up, transfer it onto the block and actually carve and print the thing, but in the meantime, I wanted to share some images from the design process.

I started with this drawing of the Virgen de Guadalupe which I originally created for this print.

OXYTOCIN_leeanndicicco7For the new print, instead of standing on top of the moon and being held aloft by a tiny baby angel, Lupita here is going to be riding around town on an oxytocin molecule while breastfeeding.  So the first thing I did was erase the bottom of the original drawing and re-draw it.

Two different versions of the Virgen de Guadalupe with the oxytocin molecule. I ended up going with the one on the right. (ART SECRET: Add maximum majesty lines to all artworks all the time. )

Two different versions of the Virgen de Guadalupe with the oxytocin molecule. I ended up going with the one on the right. (ART TIP: Add maximum majesty lines to all artworks all the time. )


Next I needed to change her hands from their usual praying position.  So I added a transparent white layer in Illustrator, printed it out…

OXYTOCIN_leeanndicicco1

…and redrew the area.

OXYTOCIN_leeanndicicco5

Pencil drawing.


OXYTOCIN_leeanndicicco6

The inked drawing.


I then added a background, pieced everything together.  and here is the final design.


Print

I’m planning to put this on a three foot by four foot block (same dimensions as the Periodic Table print) and I am beyond excited. Stay tuned for updates as the carving/ printing progresses.

New Jumbo Woodcut: Blood and Bones

Hey everybody! Here are some process shots from a giant woodcut I recently wrapped up.  It’s called “Blood and Bones” and was created for a Day of the Dead show at the Art House Gallery in downtown Fresno.  When they invited me to do the show they said I had a 4 foot by 4 foot space.  So naturally I decided to carve a 3.5 foot by 3.5 foot block.

I  started by making a small drawing which I then blew up to the appropriate size.  Here you see Tali helping me piece the blown-up image together.


LeeAnnDiCicco_Bones9

LeeAnnDiCicco_Bones8

All pieced together and ready to be transferred onto the block!


Then a lot of carving happened…

LeeAnnDiCicco_Bones3And then some more…

LeeAnnDiCicco_Bones4And then we changed directions entirely…and did even more carving!

Tali, get out of the way!  "But I'm helping!"

Tali, get out of the way! “But I’m helping…by being adorable.”


Finally it was time to ink up and print.

Like my big periodic table block I printed this big fella with a wooden spoon.  Here I am just peeling back the paper a bit to check my progress.

Like my big periodic table block I printed this big fella with a wooden spoon. Here I am just peeling back the paper a bit to check my progress.


And here’s the completed piece in my state-of-the-art drying rack (taped onto the wall).


LeeAnnDiCicco_Bones7

Woo hoo!  I’m loving doing these over-sized blocks, even though printing them with a spoon is starting to lose some of its charm.  Though taking a full day to print one of these guys with a spoon does give me a chance to visit with an old college friend. And that friend, of course, is tendinitis. On a related note, I was wondering if any of you have any experience printing with a print frog? I’m thinking of picking one up and would be interested in hearing about your experiences with them.  Please let me know in the comments!


Virgen de Guadalupe (Our Lady of Woodcut)

Hey everybody!  A while ago I shared some process photos from the Virgen de Guadalupe print I was working on.  Today I would like to share some images of the completed piece.

Here I'm trimming out the light-weight chine-colle paper that i printed the block onto.

Here I’m trimming out the strips of light-weight chine-colle paper to different lengths.


Tali being an excellent studio assistant/ demanding cuddles as always.

Tali being an excellent studio assistant/ demanding cuddles as always.


The completed piece! the light-weight paper all nicely mounted onto Reeve's BFK and all ready-to-hang in a fancy mirrored frame. Yay!

The completed piece! The light-weight paper has been mounted onto Reeve’s BFK and it’s all ready-to-hang in a fancy mirrored frame. Yay!

Bird on a Cactus

Hey everybody!  Here are a few process shots from the making of my woodcut “Bird on a Cactus.”

In the early stages of carving.

In the early stages of carving.

LeeAnnDiCicco_BirdOnACactus6

So I can hear you saying “So LeeAnn, what’s with all like, the criss-cross lines in the background?  Is the bird in a cage?  Standing in front of a waffle?  WTF is going on?!”  Well first of all, calm down, and please, watch your language!  The idea behind the lines is to be evocative of papel picado (mexican punched paper.)  This comes across a little more clearly when you see the final product.


Pulling a proof in red ink on news print.

Pulling a proof in red ink on news print.


Starting to print the edition on pink unryu, a very thin japanese paper that comes in a variety of colors.  It's my very favorite thing to print on at the moment.

Starting to print the edition on pink unryu, a very thin Japanese paper that comes in a variety of colors. It’s my very favorite thing to print on at the moment.


Cranking out the edition.

Cranking out the edition.  Do you like my fancy drying rack?  Yeah, it’s just a desk.


The completed print.

The completed print.


To finish up the piece I trimmed it out in this decorative shape to reinforce the papel picado concept, and then mounted the thin unryu onto some nice thick printmaking paper (Reeve’s BFK.)

As is the case with a lot of my personal work, I developed the imagery for this piece by drawing improvisationally, and was only able to identify once I’d started in on the carving, the significance of the image.  Like many of my pieces this is a kind of self portrait.  The bird on the cactus being a reference to the eagle atop the cactus of the Mexican coat of arms and the Aztec legend of the founding of Tenochtitlan, alludes to my Mexican-American heritage.  However the bird in this piece is clearly not a legendary eagle devouring a snake, but something decidedly less bad-ass, an adorably chubby little finch…or maybe a slightly overweight black bird. By creating this representation of myself as this not-so-legendary little bird, I explore another aspect of my identity, that of being mixed.  I think a lot of people of mixed race or ethnicity can probably relate to the feeling of not quite belonging in any group, not feeling quite legitimate. And maybe, like me, feeling like marking the boxes for both “Hispanic” and “White (not of Hispanic origin)” on standardized tests in school made it seem as if the two halves of your heritage somehow cancel each other out.  So ultimately this piece is meant as a kind of tongue-in-cheek representation of my own identity as a mixed Chicana.  I may not be the majestic eagle of Aztec legend, but I am still myself, and that’s still pretty good.

On a related note, I think I might do another version of this print in which the bird has a worm in it’s mouth to make the reference to the eagle more explicit.

Print in Progress: Little Bat

Hey everybody!  Here are a few images of a new piece I’m working on; a small linocut of a cute little bat.

Sketching out the design on the lino block in pencil.

Sketching out the design on the lino block in pencil.


As always, Tali supervises my progress.

As always, Tali supervises the process.


Going back into the drawing to mark where I will be making cuts.

Going back into the drawing to mark where I will be making cuts.


Carving away!

Carving away!  (OMG look at those fangs!  You can just tell that bat is so stoked to be a bat, you know?)


I will post more as the progress continues.  P.S. Do you enjoy this blog but would like to follow me on a social media platform that I update more frequently, has less text, more pictures, and a lot more selfies/ pictures of my cat?  Then you should follow me on instagram, homie!

Printmaker Gift Exchange: Part 2

Hey everybody!  So this is the second part of the 2-part print exchange I participated in back in December and posted about here.    The first half was an exchange portfolio of small little postcard sized prints.  For the second half, each participating artist printed a single t-shirt that related to the image on their postcard print.  So in the end, everyone ended up with a complete portfolio of prints, and a unique, hand-printed shirt.  It was pretty awesome.

Since my little print was of the moon, it seemed only appropriate that my shirt should bear the image of the Apollo Lunar Module. Generally I like to carve wood, but lately I’ve been really into carving stamps out of super soft linoleum.  Here’s my cute little Lunar Module linoleum stamp!

LeeAnnDiCicco_LunarModule1jpg

Adorable!  As soft and pink as a mouse’s tummy.  Is that an expression?  No it is not.  But it should be. *

There are two things I really love about making these lino stamps.

1. Because the linoleum is so soft, it takes almost no pressure to get a nice, crisp impression. Just ink your stamp up real nice and apply pressure with your finger tips. How easy is that? (Super easy!)

2. You don’t have to carve out all of your negative space – you just chop it off with an Exacto knife! BOOM!

Here are a couple tests I did on newsprint before stamping onto the shirt.

LeeAnnDiCicco_LunarModule4 LeeAnnDiCicco_LunarModule2

And here’s the final product.

LeeAnnDiCicco_LunarModule3

This project combined my love of printmaking, space exploration, and half-drop patterns in a way that no other project has before.

And finally, here are some shots from the clean-up which I’ve always felt, visually speaking, was a very underrated part of the process.  I mean look at that!  So  inky.  So beautiful.

LeeAnnDiCicco_LunarModule5 LeeAnnDiCicco_LunarModule6


*It has come to my attention that mouse tummies are not pink.  That may explain why this phrase is not catching on…like, at all!

Printmaker Gift Exchange: Part 1

Back in December I participated in a really cool holiday gift exchange with some of the other printers affiliated with my local printmaking club, Print and Glory.  The exchange was in two parts. The first was an exchange portfolio for which we each printed an edition of postcard-sized prints.   For the second part we each printed a single t-shirt with an image related to our postcard print.  Everyone who participated got a cool little stack of prints and a one-of-a-kind shirt.  In today’s post I will be sharing some images of my little print. I’ll also be doing a post about the t-shirt I printed a little later on.

For my postcard print, I did a two-run stone lithograph of the moon.

Before being printed in color, the image was drawn onto the stone with black lithographic crayon.

Before being printed in color, the image was drawn onto the stone with black lithographic crayon.

Etching my stone, which means brushing a combination of gum arabic and nitric acid onto the limestone block, or as I like to call it, my beautiful baby limestone sheetcake.

Etching my stone, which means brushing a combination of gum arabic and nitric acid onto the limestone, or as I like to call it, my beautiful baby limestone sheet cake.

A big pile of the two-run lithos.  "But LeeAnn" I hear you asking "why did you print so many?"  Well, dear reader, I would love to answer you, but I cannot, becuase there are only lithotine fumes where my brain used to be. * *Lithotine is solvent used in the lithographic process.** **You should not breath in lithotine.

A big pile of the (almost complete) two-run lithos. “But LeeAnn” I hear you asking “why did you print so many?” Well, dear reader, I would love to answer you, but I cannot, because there are only lithotine fumes where my brain used to be. *
*Lithotine is solvent used in the lithographic process.**
**You should not breath in lithotine.

At this point it was looking pretty good, but just needed a few finishing touches.  First I trimmed it trimmed each print down, rounded the corners, and added a little hand-coloring. IMG_6127Then, in the tradition of the great masters like Daumier, I sewed on some sequins.*** IMG_6155 IMG_6156***Daumier never sewed sequins onto his lithographs.  He just wasn’t cool enough I guess.


And that’s my print: a tiny, sparkly tribute to my childhood love of space, space travel, and aerospace engineering, and my adult determination to keep that love alive.

Linocut Stamp Making Workshop

Hey everybody!  Here a few shots from my recent linocut stamp making workshop at the Fresno Art Museum.

We dubbed this guy "Christmas Crow." It's hard to see in the photo but the paper is full of ~*sparkles*~.

We dubbed this guy “Christmas Crow.” It’s hard to see in the photo but the paper is full of ~*sparkles*~.

Foxy!

Foxy!

Making some super weird wrapping paper.

Making some super weird wrapping paper.

A few demo stamps I made.

A few demo stamps I made.

Big Printing

Hey everybody!  Back in 2013 I posted some images of a giant woodblock I carved being steamroller printed at the Taste the Arts festival in Visalia, California.  But did you know that I also have video of this glorious printmakerly occasion!  Well I do!  And I finally posted it online! Check it out!

Did you noticed that at the end I sound really pleased and surprised that it actually turned out? Well that’s because as cool as steamroller printing is, it’s much more about making a spectacle, and not really a terribly effective way to get nice crisp prints. We only got about 3 decent prints of my block that day which was just not enough to satisfy my need to edition this sucker.  So just a couple months ago I got a hold some over-sized mulberry paper and thought I would try printing this monstrosity by hand.  And it actually came out pretty well.

Jammin' away on this giant block with my tiny spoon.

Jammin’ away on this giant block with my tiny spoon.


periodictable1

IMG_4012 Close-up of the final piece.

periodictable2

This wouldn’t fit on my drying rack so I stuck it on my easel.


The whole ordeal was pretty time consuming, but not as difficult as I thought it would be.  When I first tried hand printing this thing I only had enough paper to make two impressions.  But I just ordered a couple of new rolls of over-sized paper and am hoping to start making more of these beauties in the next few weeks. Also, the realization that hand burnishing a block this large really isn’t that difficult has definitely inspired me to keep working at this scale.   I’m already planning my next giant piece.  I’ll keep you guys posted!

Enter your email address to follow this blog and receive notifications of new posts by email.

Join 125 other subscribers